
 The text and the images on this post have been published as an article in the Newsletter No4 (December 2016) from the Analogue Group of the Royal Photographic Society.
Reference/Citation: MITJÀ, Carles (2016) A hybrid approach to photogravure on copperplate. Analogue (4) pages 3 to 6. Bath: The Royal Photographic Society.
Photogravure was part of the early attempts made in the discovery of photography. Several previous experiments had been performed by Joseph Nicéphore Niépce and Henry Fox Talbot derived from the pre-existing gravure and etching techniques. Finally, after the first negative-positive systems appeared and responding to a problem with the permanence of his paper positives (Schaaf, 2003), Henry Fox Talbot patented the first photogravure method in 1852. Many years later, in 1879, the photographer and engraver Karel Klič modified the early Talbot method taking advantage of Joseph Swan’s and Louis de Poitevoin’s technique for the so-called carbon printing method. Klic’s decisive contributions were the aquatint grain on the copper plate and the use of gelatinised paper sensitised with potassium or ammonium bichromate, known as the carbon tissue. The result was called the Talbot-Klič method.
My interest in photogravure begun in 1985. I had seen some photogravure reproductions from the American photographer Jon Goodman in an issue of Camera from Switzerland (Goodman, 1981) and I became captivated by the description of the procedure. Looking for information, I discovered that several well-known photographers such as Edward S. Curtiss, Alvin Langdon Coburn, Alfred Stieglitz, Paul Strand and many more had been devoted to copy some of their images in photogravure. In his book The Printed Picture, the photographer, printer and teacher Richard Benson (2008) says, “…the [gravure] result could be more beautiful than anything else in photography”. Two years ago, being retired, I finally had the opportunity to explore this beautiful technique. After progressing through trial and error, I am now obtaining what I dare qualify as reasonable results. Beyond the complexity of the photographic part of the process, the photogravure encompasses an added difficulty since it requires skilled printing techniques. This elongates the learning process.
To produce a photogravure on copperplate, some materials need to be prepared as well as easy access to equipment. In first place, we need a system to obtain a positive transparency of the image to be etched. The original can be a photographic black-and-white slide or a high-quality inkjet printed version from a digital file. At present, I use an Epson R3000 printer with the Epson Ultrachrome Ink Set and the software of control QuadTone RIP printing on Pictorico OHP film (see suppliers).
Other items to be considered are:
- Gelatinised paper, which can either be prepared by ourselves or bought. The two options still available today are Phoenix and Dragon Gravure from Cape Fear Press (see suppliers).
- A yellow safelight free of UV radiation.
- A solution of potassium bichromate (K2Cr2O7), 3% to 5% in water, the concentration affecting the contrast of the final print.
- An aquatint box to grain the plates is also necessary. An alternative (and my current option) is a transparent screen of randomly distributed tiny points, digitally prepared in a computer and photographically printed on high contrast black-and-white film.
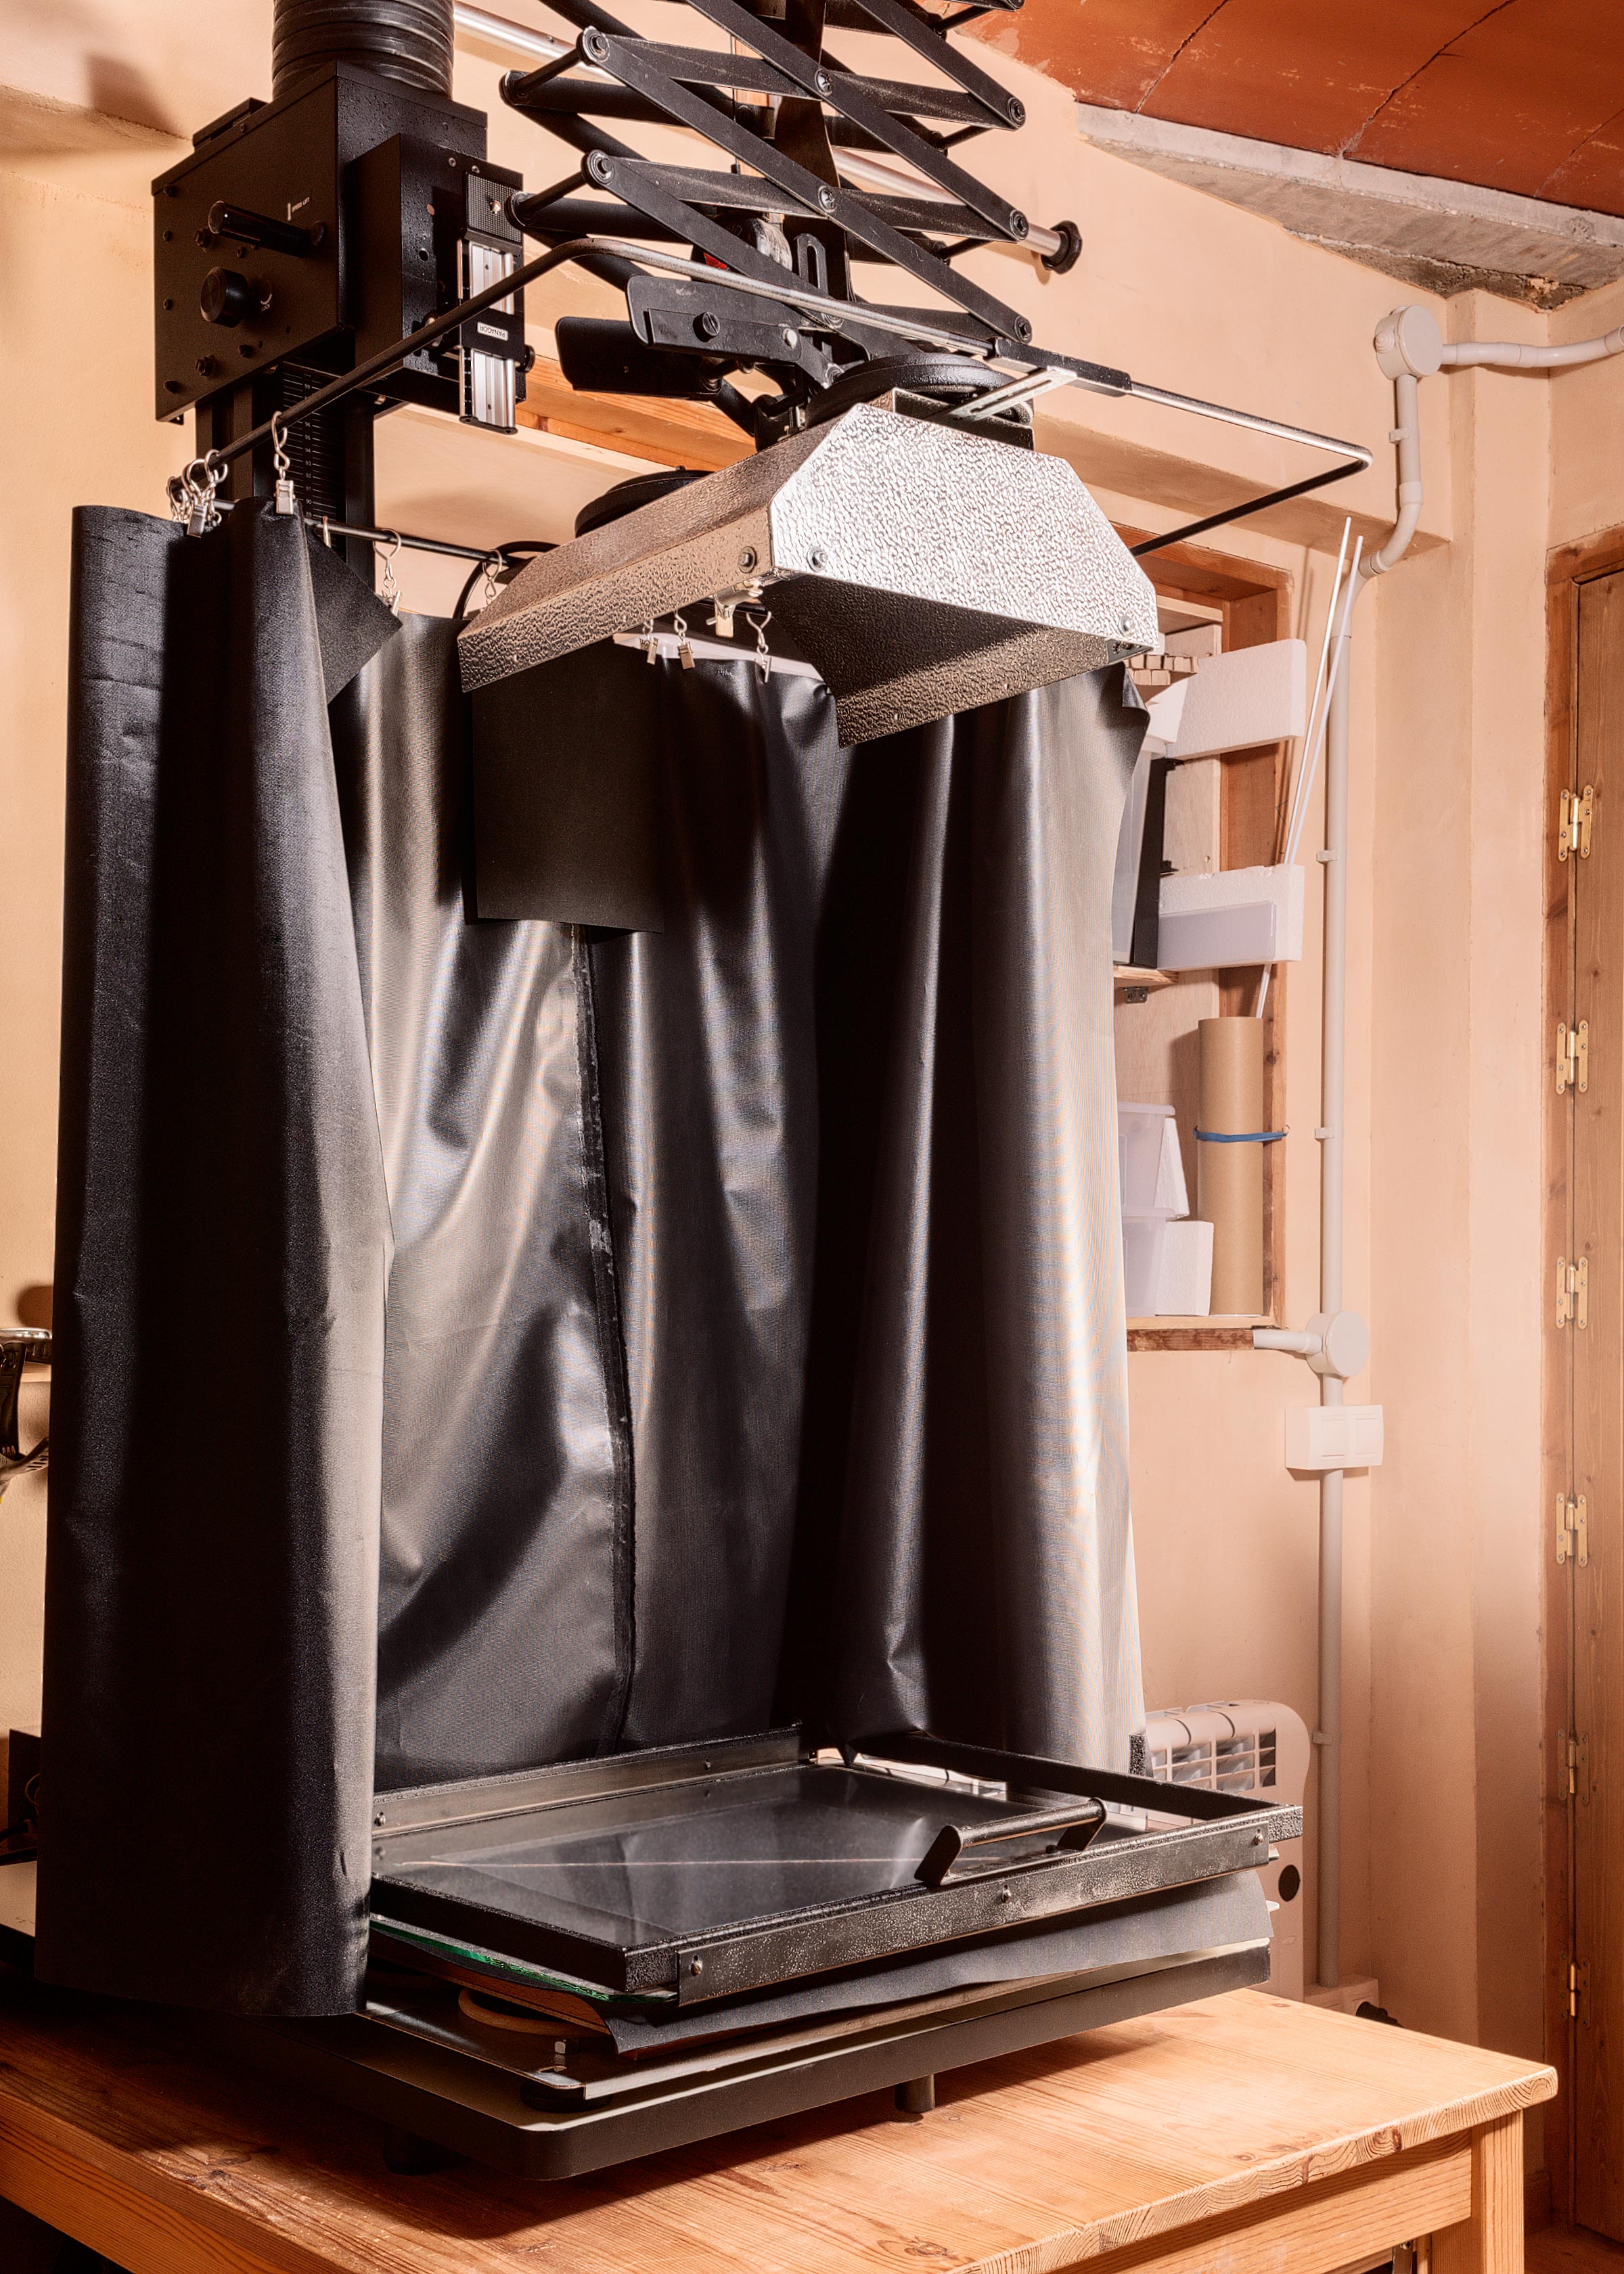
- A vacuum contact press with a suitable ultraviolet (UV) lamp source (Mitjà, 2016a) to expose the carbon tissue both through the screen and the positive transparency.
- Finally, we need all the usual materials and tools in an engraving workshop, for example:
- Copperplates.
- Trays for the several wet steps.
- Ferric chloride (FeCl3) baths in different concentrations.
- Etching inks, inking and wiping accessories.
- Blotting paper.
- Etching paper
- An etching press.
As an improvement to the traditional procedures, and taking advantage of a hybrid workflow, I use several digital techniques to contribute to the final quality of the photogravure on copperplate. The positives derived from digital files, both digital captures or scanned pictures on film, can be accurately processed in a computer to a level only achievable with difficulty by photochemical methods. After a given image is technical and aesthetically finished, digitally printed positives offer a direct control over the total density range by means of QuadTone RIP printer controller.

However, probably the greatest contribution from digital techniques is the preparation of suitable digital screens. The digital screen (Fig. 1) ensures both a high resolution in the final print and a standardised method to graining the plates. A photomacrograph taken from a plate shows that its labyrinth scheme is accurately reproduced after the etching process (Fig. 2). Notice in particular, looking at the photomacrograph taken from the correspondent print, the geometrical pattern of the screen is completely lost when the ink passes to the paper under the etching press. The screen pattern merges with the paper fibres and is no longer present creating an even tonal shade .
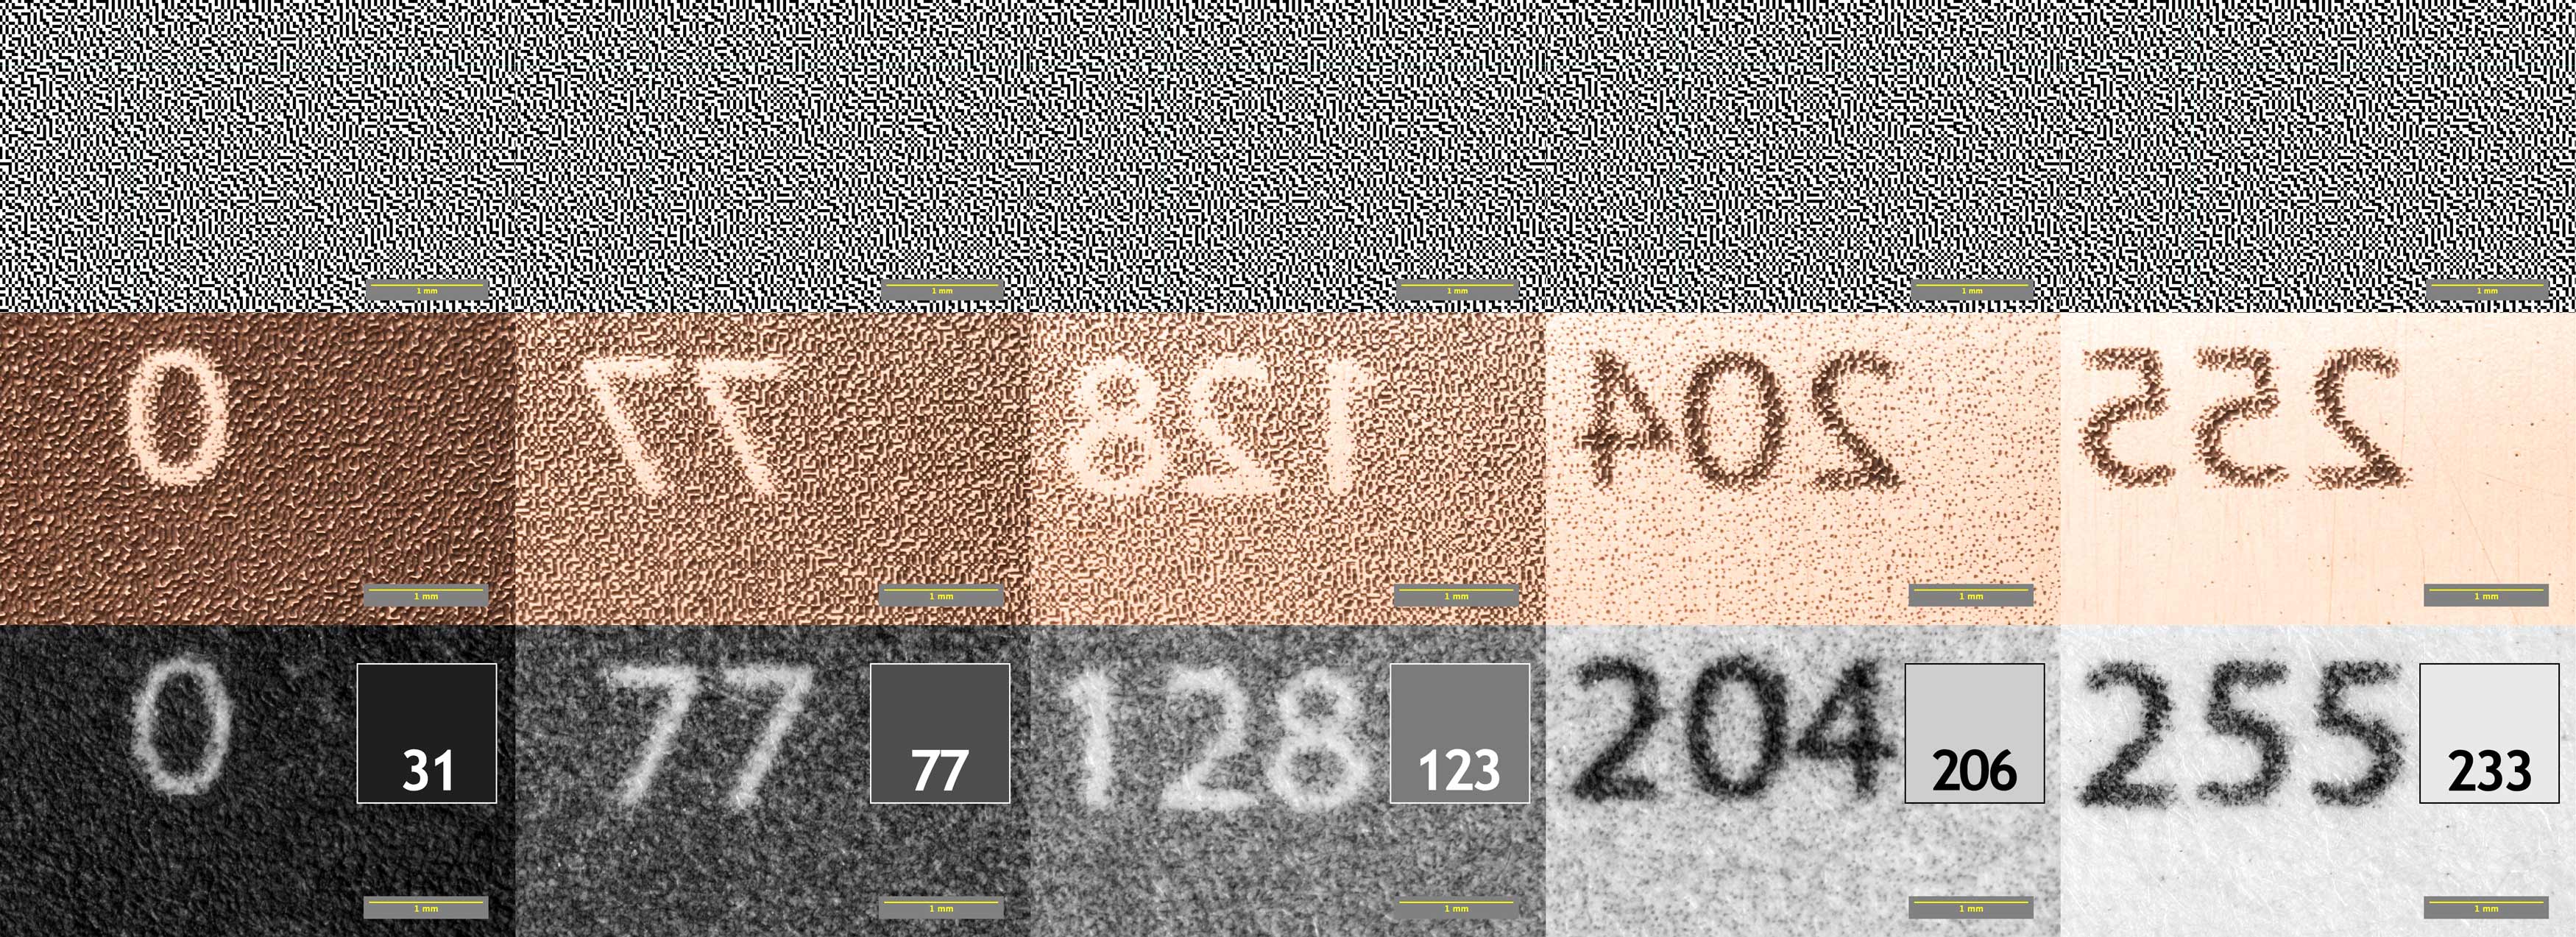

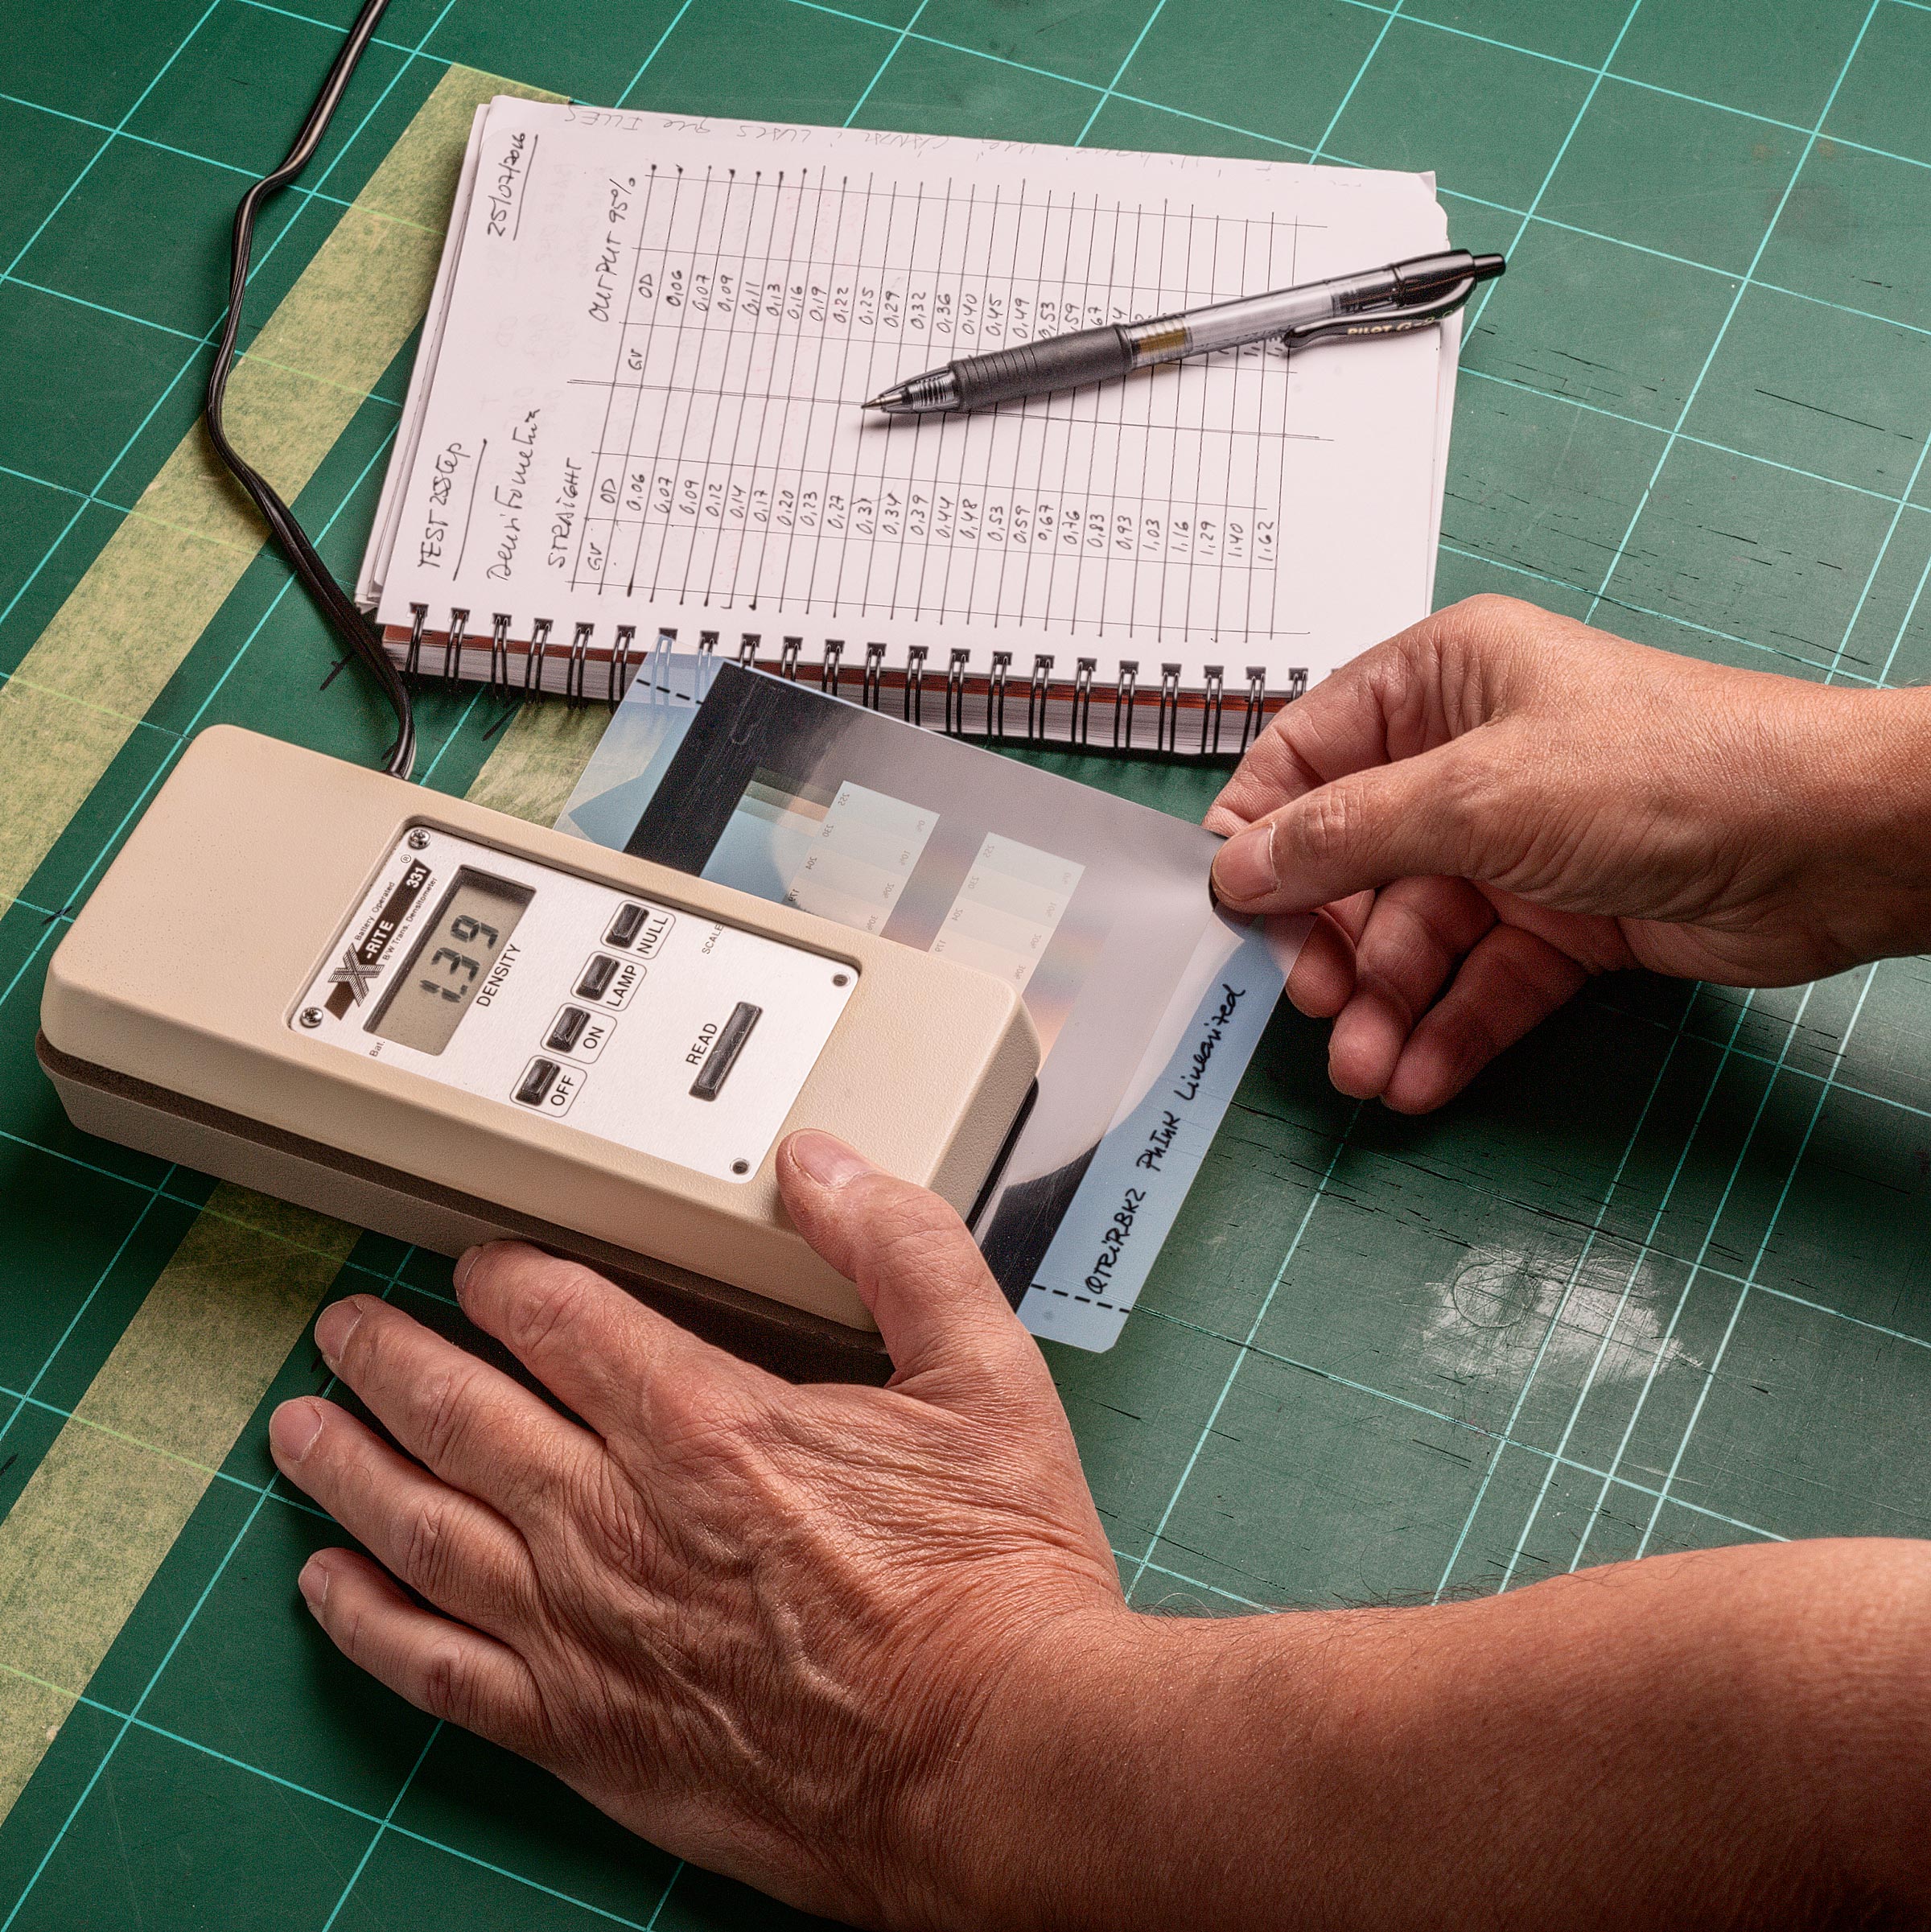
The calibration system also benefits from digital image techniques. The first thing to control is the total density range of the positive transparency. Then, a suitable test target (Fig. 3) is necessary to be printed with the same method used for the positive transparencies. The imprinted density range from black to white can only be reliably monitored with a transmission densitometer (Fig. 4). Suitable density range depends on the light source, the kind of carbon tissue, and the sensitiser concentration employed. The second question is to adjust the linearity of the grey tones in between the total test scale. Digitising the resulting test target in a final print allows readings to be taken of pixel grey level on the test patches. With these readings, it is not so difficult to build a software curve compensating the lack of linearity (Mitjà, 2016b). Finally, do not forget that a perfect linearly etched plate cannot provide a fine print by itself. The techniques of inking, plate wiping, paper dampening, and application of pressure in the etching press are decisive contributors to obtain a fine print beyond the simply correct one.
In brief, the general procedure is as follows
- Prepare a perfectly polished and degreased copperplate.
- Prepare the monochrome positive image in the computer.
- Print it on a transparent media.
- Cut out a piece of carbon tissue of the same size as the plate and the positive.
- Sensitise the gelatinised paper by immersing it in a potassium bichromate solution.
- Stick the sensitised carbon tissue face down to a plexiglass plate bigger in size and let it dry.
- Expose the carbon tissue to the UV light through the digital screen (Fig. 5).
- Expose it again through the transparent positive. As a result, the lighter areas of the image generate a thicker hardened gelatine layer than the shadows.
- Stick the carbon tissue onto the copperplate, gelatine layer face down to the polished copper.
- Rinse the sandwich in hot water (≈50ºC). Remove the base paper and wash out all the non-hardened gelatine. There is now a gelatine layer on the copperplate whose difference in thickness is related to the image tonal values.
- Etch the plate in a succession of ferric chloride baths with decreasing concentration, looking at the progression of the etching in the different tonal areas of the image.
- Wash and dry the etched plate.
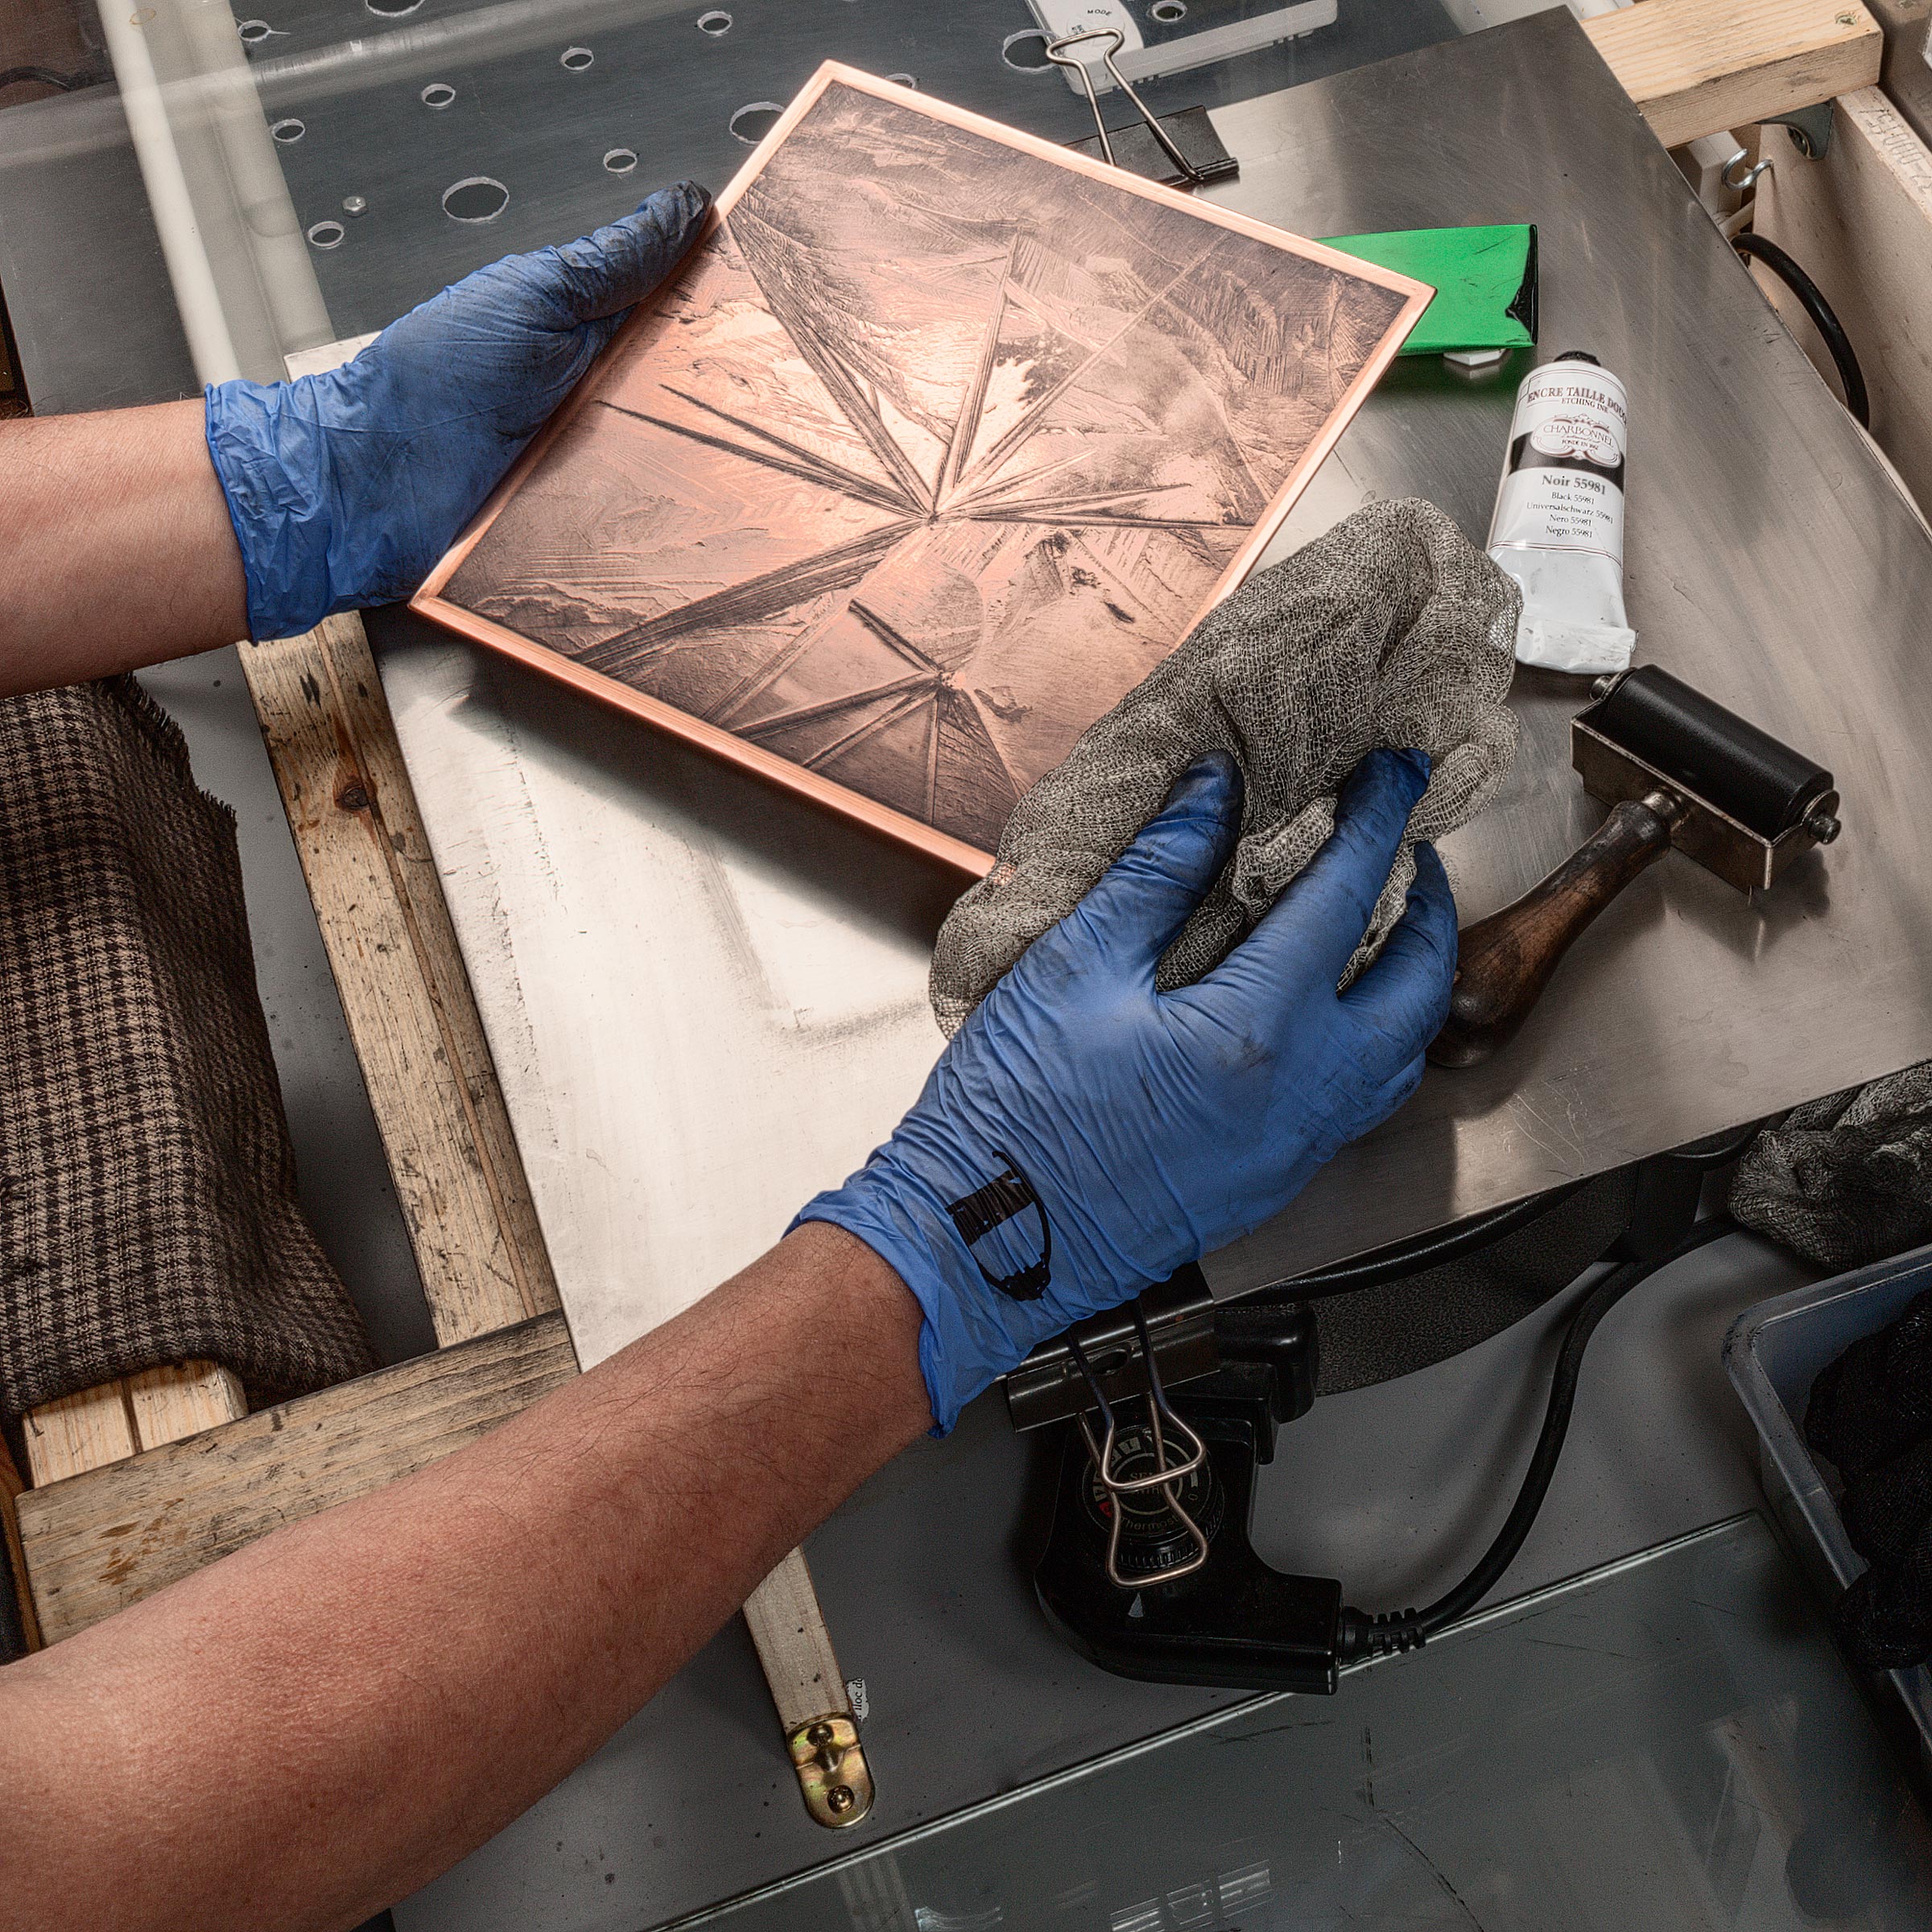
- Ink and wipe the plate as is usual in printing practice (Fig. 6).
- Pass the inked plate in contact with a wet paper under the cylinders of an etching press (Fig. 7).
- Allow the inked paper to dry (Fig. 8).

Finally, why do photogravure? Although it is a difficult and long path, if all steps are correctly applied, a photogravure print shows a complete tonal range image with subtle lights, smooth transitions and dense blacks. A sense of thickness is clearly perceived, especially with classic oil-based etching inks. A photogravure print looks more like an object than a flat sheet of paper. In these days of digital imaging, photogravure as a final art rewards the digital file with a physical, tangible and long-lasting expectancy. It combines the advantages of nowadays technology with the sensitivity of hand crafted things.

Several examples of prints made with the described method can be seen at: https://carlesmitja.net/2016/10/08/heliogravure-gallery-cityscapes/ , https://carlesmitja.net/2016/02/24/heliogravure-gallery/ and https://carlesmitja.net/2017/03/25/heliogravure-gallery-landscape/
References
- Benson, R. (2008) The Printed Picture. The Museum of Modern Art, New York.
- Goodman, J. (1981) Jon Goodman Portfolio. Camera 60th année Nº7 Juillet 1981. Pages 27-34.
- Mitjà, C. (2016a) Heliogravure III – Ultraviolet Light with Digital Screen. Online: https://carlesmitja.net/2016/01/17/heliogravure-iii-ultraviolet-light/
- Mitjà, C. (2016b) Heliogravure IV – Some Overall Thoughts. Online:
https://carlesmitja.net/2016/01/31/heliogravure-iv-some-overall-thoughts/ - Schaaf, L. J. (2003) Etchings of Light. Brochure Sun Pictures: Talbot and Photogravure from Hans P. Krauss Gallery, New York.
Bibliography
- Blaney, H. R. (1895) Photogravure. Ed. The Scovill & Adams Company, New York.
- Cartwright, H. M. FRPS (1930) Photogravure. American Photographic Publishing Co., Boston, Massachusetts.
- Cartwright, H. M. FRPS (1961) Ilford Graphic Arts Manual Vol1, Photoengraving. Ilford Limited, Ilford, Essex.
- Denison, H. FRPS (1895) A Treatise on Photogravure. Ed. Iliffe & Son, London.
- Morrish, D. (2003) Copper Plate Photogravure, Demystifying the Process. Focal Press, New York.
- Reeder, R. (2010) Digital Negatives for Palladium and other Alternative Processes. Ron Reeder.
- Saff, D., Sacilotto, D. (1978) Printmaking. Harcourt Brace Jovanovich College Publishers, Orlando, Florida.
- Sacilotto, D. (1982) Photographic Printmaking Techniques. Watson-Guptill Publications, New York.
Suppliers
- QuadToneRIP. Software to control photographic quality inkjet printers. Online: http://www.quadtonerip.com/html/QTRoverview.html
- Pictorico OHP. Transparency Film for high quality inkjet printing. Online:
http://www.mitsubishiimaging.com/pictorico-transparent-film.html - Dragon Gravure Carbon Tissue. Gelatinized and pigmented paper. Online:
http://capefearpress.com/order.html

Hello Carles
Thanks for this post. I dicover this morning.
I will read it seriously I mean in order to fully understand the way for hybrid approch
Bien amicalement à toi
jean-claude
LikeLike
Sir ,
Great post.
I’m from India.
I love contemporary printing methods.
Can you help me by saying where can I buy a printing press for photogravure process ?
My maximum size of printing would 13″ x 19″.
Thank you 🙂
LikeLike
Dobrý den jakou má cenu taková desková fotografie mám 7 kousků ale nevím kolik by byla cena kdybych to chtěla prodat
LikeLike